You are using an out of date browser. It may not display this or other websites correctly.
You should upgrade or use an alternative browser.
You should upgrade or use an alternative browser.
Winter projects
- Thread starter Formula Tenn
- Start date
Formula Tenn
New member
weather is getting a bit warmer here so i'll be continuing with my new flooring, hope to make leaps and bounds of progress by the end of the weekend!
Home Aweigh II
New member
FT,
Wow! Looks fantastic.
HA II
Wow! Looks fantastic.
HA II
Formula Tenn
New member
thanks! we can't wait to see what it is gonna look like on the boat. maybe this weekend.....
Formula Tenn
New member
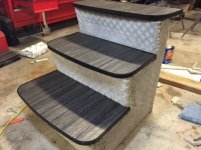
stair treads and hatches have the new flooring installed. working on trimming off the excess, cleaning up the edges and installing finishing trim. finishing trim starts out as a straight piece and then has to be hand formed around the edges. first piece seems to be looking pretty good so far  .
.
Attachments
formula40pc
Member
looks great , keep up the good work
soonerjake
New member
Looks fantastic! Can't wait to do this upgrade on ours!
HN,
Do not connect the garden hose up to the generator, as the pressure will force water into the exhaust, and possibly bend connecting rods if fired up.
Remove the impeller and run it for a short period dry. It has closed cooling, and really will not hurt anything.
Do not connect the garden hose up to the generator, as the pressure will force water into the exhaust, and possibly bend connecting rods if fired up.
Remove the impeller and run it for a short period dry. It has closed cooling, and really will not hurt anything.
Formula Tenn
New member
Haulin Nuts
New member
Nice you have some cool projects going also! I like the steps.
Formula Tenn
New member
weather has been too cold to work on much more than the dash so that has been my focus for the past week or so, time permitting. got it down to the boat and began changing out wires. mash brakes. hard. new gauges are wired differently than old gauges. i started with the lighting circuit. i can make it work but it looks like fido's ass if ya know what i mean. same thing for the grounds, each of my old gauges required 2 grounds, one for the light and one for the gauge. my new gauges incorporate the grounds into one so i have all these grounds left over on the original harness. did i mention fido's ass? i have however found a cure! ordered new wire and connectors to build my own harness that will have correct spacing and correct number of connections. it looks like i will only have to do this for the lighting circuit and the ground circuit so far but if the weather and temps will cooperate i'll know more by the end of the week.
Formula Tenn
New member
a photo of existing wiring for reference. in theses pics i have already cut all the zip ties that keep everything nice and neat. you can get an idea of how this would look if i just plugged it in and went with it.
Attachments
Last edited:
Formula Tenn
New member
self testing to see how images are working for me, new ground and power wiring harness for dash light circuit to switches and gauges on throttle plate.
I order proper wire color, connectors and heat shrink to make these harnesses up.. doing the same for the main dash panel, so far only planning on doing this for the light circuit. sending unit wiring will hopefully be reused.
I order proper wire color, connectors and heat shrink to make these harnesses up.. doing the same for the main dash panel, so far only planning on doing this for the light circuit. sending unit wiring will hopefully be reused.
Attachments
Last edited:
Formula Tenn
New member
i see the humor in what you are asking, you want me to splain the unsplainable!! doing the pics was pretty easy but i guess my older stuff will remain as is, i have been unable to figure anything out on them.
so to add the thumbnails, i clicked on "Go Advanced" in the lower right corner next to "Post Quick Reply", then "manage attachments". from there it should be pretty straight forward.
so to add the thumbnails, i clicked on "Go Advanced" in the lower right corner next to "Post Quick Reply", then "manage attachments". from there it should be pretty straight forward.
Formula Tenn
New member
no sure if this might make a difference or not but under the general settings tab, i went to thread display and checked the box that says "show images". Also went to miscellaneous and checked the box that says "enhanced attachment upload on". this was in an effort to see my older pics so not sure if that made a difference on my recent post.
Formula Tenn
New member
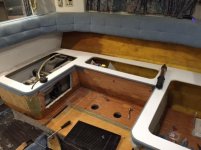
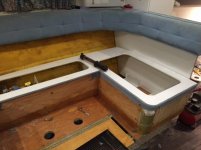
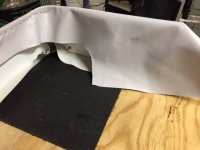
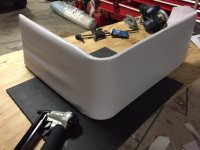
learned new trick so here is a little bit of an update. wood floor and steps are done other than trim pieces, no pics yet but i'll get some soon. settee area is getting facelift of sorts, trim panels to be recovered and cloth liner between back rest and bottom cushions will be replaced with new headliner material. hoping to get back rest and three bottom cushions reupholstered before we come to a stop on this winters work. boat is a disaster right now but i'll post a few more pics as soon as we get it looking decent here is what i have for now:


Formula Tenn
New member
the blue covered back rest in the above pics needs to come off, looking for info on how it is installed.
soonerjake
New member
Those steps look great! very nice work
