Once in a while questions come up about the cabin headliner in the Sun Sport models. As the boat ages, it seems that gravity takes its course and the headliner can come loose or the material starts to sag. My 1996 F-330 is approaching 20 years of age and the headliner fabric is starting to come down . . . mostly in the rear portion of the cabin.
So, the other day, I took the headliner down and plan to refurbish it and put it all back together.
Here are a few photos from the 'project' . . .
Starting point, the headliner in the cabin:

The center section is 1/4" plywood, covered with headliner cloth. The side sections are glued to the ceiling (underside of deck).
The side sections in my boat were in decent shape, so my focus is just on the center section. It is screwed into the ceiling at 3 locations under the overhead lights, and also held up by the fascia boat at the bow and 'trapped' by the restroom and cabinet at the rear of the cabin
Along the cabin hatch, the trim holds the headliner up as well

I needed to cut the wiring to the lights as they are hard wired and not on connectors (at least on my boat). I plan to add connectors upon re-assembly. The larger screws under the lights hold up the headliner section (at least they should)


Getting the headliner to come out from the rear portion is a bit tricky, but I was able to bend it a bit and get it to relieve from the restroom side. . . then pull it out from the cabinet side (not easy though)

The cloth material had separated from the foam backing, mostly due to the deterioration of the foam.

Upon inspection of the headliner, I could see that it is made of 2 pieces of 1/4" plywood, bonded together by a 1/2" thick section of plywood. My plan for re-assembly is to separate these 2 pieces and put the rear section in first, then do the longer section. I will probably need a couple of screws to attach the 2 pieces, which will show, but probably worth the ease of re-installing it as 2 pieces.

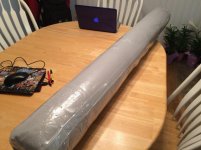
I have been searching for replacement headliner material to match the existing. Not sure exactly what it is, but it looks to be a fairly common headliner material. Formula probably still sells it, but my Internet searches have revealed that it is pricey (about 5X over other sources). So, I have ordered a color sample from a headliner supplier to see if I can find a match.
Any one know what Formula uses as their cloth headliner ??? I know their vinyl materials are Nautolex, but I am not sure about the cloth materials.
It probably will be a couple of weeks until I get the samples, order material, etc.. . I'll post updates then.
So, the other day, I took the headliner down and plan to refurbish it and put it all back together.
Here are a few photos from the 'project' . . .
Starting point, the headliner in the cabin:
The center section is 1/4" plywood, covered with headliner cloth. The side sections are glued to the ceiling (underside of deck).
The side sections in my boat were in decent shape, so my focus is just on the center section. It is screwed into the ceiling at 3 locations under the overhead lights, and also held up by the fascia boat at the bow and 'trapped' by the restroom and cabinet at the rear of the cabin
Along the cabin hatch, the trim holds the headliner up as well
I needed to cut the wiring to the lights as they are hard wired and not on connectors (at least on my boat). I plan to add connectors upon re-assembly. The larger screws under the lights hold up the headliner section (at least they should)
Getting the headliner to come out from the rear portion is a bit tricky, but I was able to bend it a bit and get it to relieve from the restroom side. . . then pull it out from the cabinet side (not easy though)
The cloth material had separated from the foam backing, mostly due to the deterioration of the foam.
Upon inspection of the headliner, I could see that it is made of 2 pieces of 1/4" plywood, bonded together by a 1/2" thick section of plywood. My plan for re-assembly is to separate these 2 pieces and put the rear section in first, then do the longer section. I will probably need a couple of screws to attach the 2 pieces, which will show, but probably worth the ease of re-installing it as 2 pieces.
I have been searching for replacement headliner material to match the existing. Not sure exactly what it is, but it looks to be a fairly common headliner material. Formula probably still sells it, but my Internet searches have revealed that it is pricey (about 5X over other sources). So, I have ordered a color sample from a headliner supplier to see if I can find a match.
Any one know what Formula uses as their cloth headliner ??? I know their vinyl materials are Nautolex, but I am not sure about the cloth materials.
It probably will be a couple of weeks until I get the samples, order material, etc.. . I'll post updates then.
Attachments
Last edited:


