95-01 to 02+ gauge upgrade?


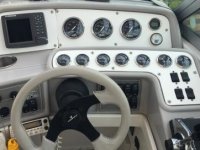
One of the members asked for some additional details on this install so thought I'd share the info here for others....

I bought the 2" gauges(trim, oil, volt, temp and fuel) from a few different places, basically where ever I found the best deals Amazon, ebay and the like. However I had to custom order the 5” gauges through West Marine (or any Faria dealer) because Faria builds these to order. I want to say the 2’ gauges were all 30-45$ and the 5” gauges were 140 and 250? Don’t quote me on that but it’s in the ball park, I just know one of the two 5” gauges was a lot more than the other…

I went with Faria Chesapeake White SS gauges here are the part numbers:

- 5" Tach with HR meter P/N:TC9381
- 5" Speed-O P/N: SE9504
- 2" Trim P/N: 13807 (merc. specific, if you have Volvo you need a different gauge)
- 2” Oil pressure P/N: 13802
- 2” Volt P/N: 13805
- 2” Fuel P/N: 13801
- 2” Temp P/N: 13804
You can find info on them here: http://faria-instruments.com/styles.php

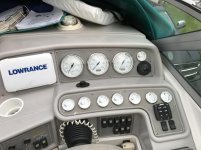
I also replaced the depth gauge face plate to match the gauges better with this: http://www.ebay.com/itm/MASTERCRAFT-LOWRANCE-3500-CHROME-BOAT-DEPTH-FINDER-REPLACEMENT-FACEPLATE-/190905159596?hash=item2c72d58fac

As for wiring and such the stock gauges use a spade connector and the new ones have a ring terminal/ post. So I found these so I didn’t have to cut all the OEM connectors off:
http://www.amazon.com/1209H-250-Stud-Ring-Adapter/dp/B00K9Z33UK

Other notes:
- I used the stock dash face plate, but had to enlarge the stock gauges hole size too fit the larger gauges
- All existing senders worked with the new gauges
- All stock wiring was used with little to no modification(removed 2[SUP]nd[/SUP] common ground for separate lights per gauge on old gauges and had to cut old zip ties and re zip tie)
 
Hey Andy - About to undertake this project myself for my 280ss. I know you upgraded to 5" from 4" for your main gauges so you had to cut larger holes in your dash panel for those... But did the 2" gauges fit the stock panel? I didn't catch that anywhere in your posts. My 280 is also a 2000, I'd like to get the existing panels simply refinished then replace the gauges. Also... Where'd you score the wheel?

Really came out great - congrats on a job well done.

thanks
chris
 
Hey Chris,

Yeah the stock gauge holes need to be opened up about a 1/8" but nothing like the larger ones, those took a bit of time and needed like a 1/2 or more can't remember exactly.

As for the steering wheel, it's the same one. I just removed the stock rubber center cover and bought a horn button w/ Formula logo off eBay. I wanted to replace it originally but honestly it looks good enough for me now so I spent the money elsewhere :)

Good luck with your gauge swap and post up some pics when you're done!
Andy
 
I bought them off a member here. They were a bit yellowed so I hit them with some Krylon Fusion paint for plastics and so far it's held up great.

I believe I have a couple left around if your wanting some shoot me a PM and we can figure it out.
 
Atuslly, I've changed my mind (again, ha!). I'm sticking with black. I'm going white carbon fiber finish on the panels and black gauges. Why? Because I haven't seen anyone do that yet with their formula panels and I'm rebellious like that.

The gauge and panel replacement project is underway, in chunks. A few of the gauges I need were back ordered and I didn't realize until AFTER the purchase. So it'll be prob mid May before this project is complete. But will post pics when done.

also, good call on removing what I like to call the "mini van look" from the wheel and simply adding a cap. Did that yesterday, much better look without buying a new wheel.
 
No problem, should look good! I thought about black as well but had already bought the white VHS radio and had the white compas, so white it was...
 
Done and done. Still waiting on back ordered fuel gauge, should be here next week. Also going to do ignition and switch panel. Thanks for the inspiration!

attachment.php
 

Attachments

  • image.jpg
    image.jpg
    19.7 KB · Views: 299
Great thread here.
Ordered new Faria Chesapeake ss gauges for my 280 BR today.
Can't wait to tackle it.

Andybellus...did you use a jig saw/sabre saw to enlarge the dash openings?

Thanks
 
Great thread here.
Ordered new Faria Chesapeake ss gauges for my 280 BR today.
Can't wait to tackle it.

Andybellus...did you use a jig saw/sabre saw to enlarge the dash openings?

Thanks

Ok good you found this thread.... was looking through my 260ss upgrades thread and was like I swear I had more info on the gauges???? Then saw this post was bumped and remembered where that info was lol


I used a Dremel tool with a carbide grout removal bit lol Not exactly the right tool for the job but I got it done and saved me a trip to the store and some $$

A real set of carbide burrs and an air grinder would make short work of it.

One of the best visual upgrades I’ve done and it’s still working and looking great(IMO).

Good luck with your project and be sure to post up once you complete it or if you have any additional questions along the way!

Andy
 
Thanks for the reply.

I used a Jig/Sabre saw to open up the holes in the dash. For the small instruments I had to do a $hit load of kurf cuts because I only needed to take out 1/16" or so.
On the larger gauges I simply cut a circle with the saw. I then spent some extra time filing and sanding with emery cloth to get it smooth.

I also decided to wrap the panels with 3M Di-noc graphite carbon fiber. Very nice, forgiving material to work with and I'm very pleased with the results. Great contrast to the stock colors of the boat. I can't wait to get everything mounted up.

Thank you for posting all the info on what you did. Sorry to copy cat the project but imitation is the sincerest form of flattery as they say.

I also ordered a new "transom" mount extended swim platform for the boat. These additions along with the new "weave" style carpet I put in last year is getting me excited for the upcoming season.

Thanks again


Image-25.jpg
Image-26.jpg

Image-27.jpg

Image-29.jpg
 

Attachments

  • Chilewich-Basketweave-Titanium-72-Floor-Covering-Fabric_1.jpg
    Chilewich-Basketweave-Titanium-72-Floor-Covering-Fabric_1.jpg
    46.8 KB · Views: 55
Thanks for the reply.

I used a Jig/Sabre saw to open up the holes in the dash. For the small instruments I had to do a $hit load of kurf cuts because I only needed to take out 1/16" or so.
On the larger gauges I simply cut a circle with the saw. I then spent some extra time filing and sanding with emery cloth to get it smooth.

I also decided to wrap the panels with 3M Di-noc graphite carbon fiber. Very nice, forgiving material to work with and I'm very pleased with the results. Great contrast to the stock colors of the boat. I can't wait to get everything mounted up.

Thank you for posting all the info on what you did. Sorry to copy cat the project but imitation is the sincerest form of flattery as they say.

I also ordered a new "transom" mount extended swim platform for the boat. These additions along with the new "weave" style carpet I put in last year is getting me excited for the upcoming season.

Thanks again


View attachment 9477
View attachment 9478

View attachment 9479

View attachment 9480

Looks GREAT!!! Really like the wrap, it’s on the list now hahaha
 
Thanks!
Let me know when/if you decide to do the wrap. I got better at it with each panel I did.
I'd be happy to let you know some of the things I did both right and wrong.
 
Someone asked me for information on the gauge swap and was having a hard time finding this thread.

Figured a bump to the top might help him and others find this info.

Following up here: the gauges are still working as they should with no issues.
 
So since the gauge updates, I decided to install blue LED's to replace the courtesy lights (added one more in the bow) as well as LED drink holders all wired together on a dimmer. The dimmer I bought is a direct replacement for the current courtesy lights switch and you simply toggle up or down to increase/decrease brightness.
It really works nice as the LED's without the dimmer were way too bright.

I also cut holes to add four more drink holders in the "galley" area. It's a perfect spot for passengers to put their drinks as they come aboard. I tried to mimic the newer 310 br arrangement.

OOps sorry about the way the photo's loaded

IMG_9617.jpg
IMG_9616.jpg61238274063__88A7EA60-476D-4D5A-A72C-8DA0DB092BB4.jpg
 
Back
Top