Formula Jr. project


Thanks for the encouragement!

While it is too cold to fiberglass, it's never to cold to plan. So, I have started calculating how much resin I will need.

My transom is roughly 6' x 3' or 18' sq. Divide by 9, = 2 square yards. Multiply by 5 courses (minimum) to replace the transom and laminate in the new transom board. = 10 yds/sq.
Stringers are 12' x 10". Call it 12 x 1 or 12 ft./sq. Divide by 9 = 1.3 yds/sq. Multiply by 4 stringers and again multiply by 2 sides then, multiply by 3 courses = 31.2 yds./sq.
Hull sides are 18' x 2' = 36 ft./sq. Divide by 9 = 3.3 yds./sq. Multiply for 2 sides = 6.6 sq./yds.

10+31.2+6.6 = 47.8 square yards of surface area.

If #1700 biaxial wets out at 1 gallon = 5 sq./yds. this is 9.56 (10) gallons of epoxy resin or,
# 1708 biaxial at 1 gallon = 4 sq./yds. it is 11.95 (12) gallons of Vinylester resin....

This is for phase 1 (hull) and does not include resin for tape, penetrating encapsulation or waste. I probably need to add 15% just for waste.
 
Last edited:
Sorry, for not seeing this thread sooner, Woobs. I have a good source for fiberglass resins and composites, etc. I am lucky enough to live 5 minutes way from these guys. The business is called Raka, Inc. I purchase all my supplies from them (including the carbon fiber and clear epoxy resin for my recent dash project posted here on the forum). They are very reasonably priced, too. Mike is the guy there that runs the show... very knowledgeable and helpful. Anyways, for Woobs and anyone else interested you can contact them at:
www.raka.com
(772) 489-4070

How is the project going by the way, Woobs?
 
Yes, I have purchased from RAKA before and like their product. It is also very well priced.

Coincidentally, I stayed at my buddies condo last fall which turns out to be on Hutcheson Island (Jensen Beach) right across from Port St. Lucie! I didn't know RAKA was there then but, found out when I got home.
Next time I'm down there I'll be stocking up :)

My project has been slow due to the winter. It's been too cold to go in the garage most days. I have managed to buy a few parts and I have been pulling apart my engine so I can see some (any) progress.

P.S. The Hoffmann German American Restaurant in Jensen Beach is the BEST German food I have ever had... and I've been to Germany more than once!
 
Last edited:
Yes, Raka is certainly conveniently located for me.

My girlfriend and her family have been to The Hoffmann and they say the same thing.

What engine does your Jr. have?
 
I currently have an old SBF Mercruiser 302 donor motor and I'm in the process of stripping it down. The plan is to build a 347 stroker with aluminum heads, HM exhausts, DUI ignition, cam driven water pump and stack injection plus a few parts from another SBF Interceptor parts motor. Light & strong... not stressed :) This will be mated to an Alpha One sterndrive.
 

Attachments

  • IMG_9508.jpg
    IMG_9508.jpg
    97.1 KB · Views: 28
Aluminum heads? What are you going to use for the freshwater cooling system? I'm not aware of any Ford/Mercruiser setups that used one. Did yours originally come with the inline 6 Chevy? If you need any part numbers (ie, transom plate, bellhousing, drive shaft, etc.) for the Ford to make the swap let me know. I have a complete set of Mercruiser microfiche film so I can look it up. They really came in handy when I re-powered my old Sea Ray Pachanga from the inline 6 to 327 V-8 with thru-hull exhaust. As a matter of fact, I'm already thinking of a V-8 swap for the Formula One. The downside to that is either the engine hatch opening needs to be modified (a sawzall and fabrication project, what fun, lol!) or the short block has to go in first and the engine block built up from there.
 
Last edited:
Yes, I have to rebuild heads anyways and weight is a major consideration for this boat. So, I'm considering some bare Edelbrock aluminum heads (or maybe AFR) and my engine builder will complete them. As for the cooling system, there are BBF systems but, I am using a 302 Ford Enderle timing cover (usually for cam driven fuel pumps) and mating/adapting it to a Glenwood Magnaflow cam driven water pump. This system can cool a big block so I'm sure it will work just fine.

I'm sure my Jr. was not a straight 6. It does not have the cut-out in the rear seat to accommodate the I6 length, nor the cover that would go with it. I believe it was a V8 due to the factory looking hole in the engine hatch that was presumably for a scoop (missing). I have a donor Mercruiser 188 (302) that came complete. Further, I have a complete Alpha drive from skeg to bell housing so I'm sure it will all fit. I'm a little sketchy on the transmission interrupter but, I'll figure that out and I'm a long way off that so there's time to think it through. I'd like to make this as clean an install as I can because this boat will be taken to shows on a regular basis. By using a DUI marine dizzy I can eliminate having to mount a coil on the block (or elsewhere) as it is integrated and it's a one wire hook up!

Since this will be a bit of a hot rod or Frankenstein build (however you see it) I'll be using parts from several different sources to accommodate my overall plan. I just decided this week to use the aluminum oil pan from the Interceptor motor. It's heavy compared to the Merc pan but, it was strong enough to act as the point of attachment for the original Interceptor motor mounts and a raw water pump. I am using the more familiar motor mounts on each side off the block however, I may be able to utilize the oil pan mounting points for other stuff (maybe an oil cooler or a closed cooling system).
 

Attachments

  • Fordcover.JPG
    Fordcover.JPG
    39.2 KB · Views: 15
  • Jrpump.JPG
    Jrpump.JPG
    23.3 KB · Views: 17
  • IMG_9607.jpg
    IMG_9607.jpg
    93.1 KB · Views: 20
  • Jrdizzy.JPG
    Jrdizzy.JPG
    18.3 KB · Views: 16
Last edited:
Do you have a transom plate and gimbal housing? What model is the Alpha drive unit? You can buy shift plates on Ebay. For some reason there is no listing for the 188 on my Mercruiser model index nor most online Mercruiser catalogs like marineengine.com. I believe the closest model to it is the Mercruiser 888.
 
Yep. Have both transom plate and gimble housing. Gimble assembly has been totally dis-assembled and is being prepped for paint before re-assembly. The Drive is an Alpha One (mfr'd in 1986 by the serial #). and NOT an Alpha Gen II. I considered using an MR pre-Alpha because it's closer to a period authentic drive but, the Alpha One will do just fine... I'm gunna paint it white.

I'm still researching the shift plate. Because I want a clean looking install, I have found some info on actually mounting the shift plate to one of the stringers (out of sight). For this I would not use the factory Mercruiser plate originally used on a Ford.
 

Attachments

  • 1928978_1349781681714440_3593196143952511253_n.jpg
    1928978_1349781681714440_3593196143952511253_n.jpg
    18 KB · Views: 28
Last edited:
The transom grinding is in its final stages. I will cut and fit the plywood core to ensure the right shape before I remove it again. I will also install the melamine false transom and remove it, before cutting out what's left of the old transom. Then back on it (false transom) goes in preparation to lay the first 3-4 courses of glass to set the new transom shape.

I'd like to get this done in the next couple of weeks. It'll be getting colder and soon and I can get to removing stringers and grinding outside at that time. I would like to be ready to glass in the new stringers in early spring. So, I have all winter to grind the hull and shape the new wood.
 

Attachments

  • IMG_0925.jpg
    IMG_0925.jpg
    95.6 KB · Views: 54
Last edited:
Great project. I respect anyone that can restore a boat given your starting point. There's a Youtube video out there documenting restoration of a 22ft. Sea Ray that had desperately rotten stringers, transom, etc. As I watch where you are right now, you might be interested in the point where the Sea Ray got a new transom. The restorer was able to salvage the exterior glass/gel coat and pretty much built up the inside with glass and plywood. Enjoy. https://www.youtube.com/watch?v=w5DaQvwTY3I
 
Yes, I've seen many "Friscoboater" videos. Quite an industrious guy.

Unfortunately, this outer transom (glass/gelcoat) on my Formula is not salvage-able. That is, to say that it would be much, much more work for probably not as good an end result. While I'm no expert, I have been getting advice/instructions from some very knowledgeable and experienced people. I have not taken on this job lightly and have done about a year worth of research to go along with the repair plan I have settled on. But, stay tuned here and over time you'll see this project unfold.
 
Last edited:
An interesting day today... okay, good and bad.

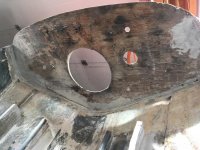
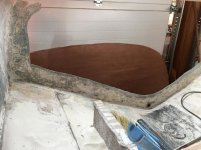
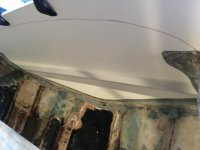
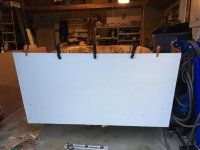
I got the plywood core cut out from the paper template and it fits, well, sort-of okay. The transom is so wavy I couldn't get the edges to meet.
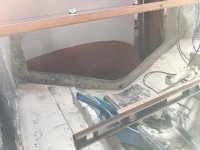
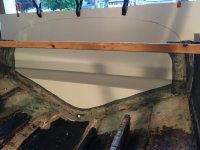
So, I braced the hull at the gunwales and cut out the offending transom that was curved and in the way (it was coming out anyways). I got a better fit but, no joy jet.
To fit the transom I need to true both the inner and outer surfaces. Also the hull sides where they meet the transom are incredibly thin so, I need to build those up.

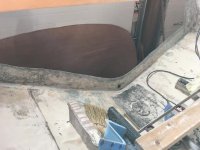
The remaining transom is just under 1/2" thick. The outer surface is proud and needs to come down at least 1/4" (maybe more) on each side of center. The problem is the inner surface is just filler and is about 1/4" thick with no fabric. It has cracked in many places adds no strength and will probably be a nice home for moisture if I leave it. If I grind the inner surface out then there's hardly any meat for the new tabs. And, if I grind the outer surface true (to mount the false transom) there will be nothing left.

So, my plan (and feel free to comment) is to grind out the inside down to the fabric (about 1/4" left). Build it back up with a few courses of 1708. then grind the exterior surface flat. I can then add more courses to the inside for strength as needed. Then feather the inside surface, install my false transom outside and glass the whole damn thing up. Then add the plywood core and tab & glass that assembly in. In this way I still have the strength from the inside pushing outward. This is a lot of work.

The alternative is to grind the inside, mount the plywood core to the remaining tab inside and then feather outside & glass from the outside and the inside to the desired thickness.

Comments
IMG_9636.jpgIMG_9637.jpgIMG_9631.jpgIMG_9632.jpgIMG_9633.jpgIMG_9634.jpgIMG_9635.jpg
 
Last edited:
Well, we have made progress on the original plan with another day of grinding.... I need to go buy some more flapper disks!

The transom flange is now ground down and feathered. The outside is flat and will accept a sheet of melamine (the next step).
Since the flange is so thin I think I will have to do a couple more courses of 1708 than originally planned.

My shop vac has literally bit the dust. So, I need to get a new one
sad.gif
 

Attachments

  • IMG_0960.jpg
    IMG_0960.jpg
    89.6 KB · Views: 31
  • IMG_0961.jpg
    IMG_0961.jpg
    92.4 KB · Views: 28
  • IMG_0962.jpg
    IMG_0962.jpg
    85.9 KB · Views: 27
More progress today!

I actually washed out the hull with the hose.... I just couldn't take the dust anymore!

Then, I got the false transom cut out and mounted. It fits perfectly with no gaps along the entire edge of the original transom flange.
I used old 2x10 scraps to make faceplates for bolting to the outside of the hull sides and bottom at the transom. The false transom (melamine) screws to these faceplates. I have left the top of the false transom square so I can drape the fabric over and it will lay flat when I roll it in. I have also drawn a line that follows the deck curve (just so I know where it is). I will trim it to shape when all the material is in and just before I put the last seal over everything.
 

Attachments

  • IMG_0980.jpg
    IMG_0980.jpg
    90.8 KB · Views: 35
  • IMG_0981.jpg
    IMG_0981.jpg
    89.1 KB · Views: 32
  • IMG_0977.jpg
    IMG_0977.jpg
    80.5 KB · Views: 33
  • IMG_0976.jpg
    IMG_0976.jpg
    86.4 KB · Views: 31
  • IMG_0979.jpg
    IMG_0979.jpg
    84 KB · Views: 34
Unfortunately, I have been busy with my woodyboat fixing a couple things, winterizing and getting her tucked away. Also dealing with a car sale amongst other stuff....

So, the temperature has now dropped below what will allow any glassing activity. My revised plan is to just take advantage of the cool weather to get some more grinding done outside (makes too much dust to do it in the garage) on the hull sides and bottom, possibly to the area of the outer stringers (there are 5 stringers). There's plenty of surface to get back to bare glass. I don't want to remove all the support in the hull for a long period of time but, if I leave the main (inner) stringers I'm sure I'll be fine. Another consideration is that I don't want to cut out new stringers and then not install them (reduced opportunity for them to warp) so, that means I must wait for spring to shape and install them too.

IMG_1034.jpg
 

Attachments

  • IMG_1018.jpg
    IMG_1018.jpg
    96.6 KB · Views: 24
Last edited:
Still following Woobs and still amazed on the skill and expertise required for a project like this. People that can do this level of finish work amaze me.
 
I have no skills (I'm just a backyard hack) and the expertise comes from others in the boating community. None of this is difficult work, the big thing is just getting the courage to actually do it.

In my case, the boat was cheap to buy and was so far gone I couldn't foul it up any more so, there was no pressure. I'm taking a long time and thoroughly researching each step and getting opinions from others that know (they don't always agree though). This helps with planning and actually getting dirty. The only other consideration is budget. The entire job is not inexpensive so research helps. Of course, if you don't do something right or, to your own satisfaction you just grind it out and do it again....no pressure. No matter how small the activity, it is important to keep moving forward. Research, planning, material acquisition, hands-on work and documentation are all part of the moving forward process. It helps to have a vision of the end product but, I can tell you that this changes as you move along.

At the end of the day you amaze yourself as to what you can do and take some pride in the accomplishments. Even the seemingly small steps make you feel good as you see the process unfold before your own eyes.
On this project I have a long, long way to go but, she don't look anything like she did a year ago. :)
 
Last edited:
Update*** it's so frikkin' cold it may as well be absolute zero! But, the Toronto Boat show is in a week or so.... :)
 
Back
Top